Set-Up Guides
Here you’ll find everything you need to know about custom laser cutting and engraving from a vector file. Have a click through each tab – we’ve included lots of expert tips and information!
How it Works
You design and get creative!
Design whatever you envision! You could draw your own shapes, or you could purchase usage rights for designs for sale online (from websites like Creative Market), or perhaps you could hire a designer to create something unique for you. You are only limited by your imagination!
You format your files for the laser
Download our vector file template and open it with a vector program (e.g. Adobe Illustrator, Gravit, etc). Format your designs for laser cutting by following our comprehensive set-up guides. Arrange the shapes that you would like in your file (using as little – or as much – of a material sheet as you would like), to be cut from anything in our material range.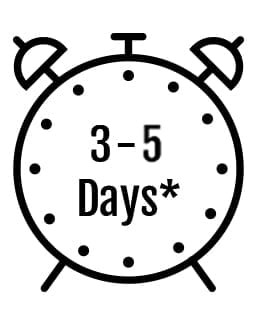
We quote your file and make it happen!
Upload your file for a quote. Want to know what it will cost? View our pricing guide. We’ll process your order on receipt of payment; our turn around is typically within 3-5 business days. Your pieces may be posted to you (anywhere within Australia), or you could collect in person from our studio.Need Help?
What is a Vector File?
How to Tell if Your File is Vector
The easiest way to tell if your file is a vector is to zoom in as far as you possibly can. If you zoom in and the design is made with pixels (such as it becomes blurred or has un-smooth edges), then your design is not a vector. If you zoom in all the way on a vector artwork, your computer will continue to re-calculate the vector lines so it will never be pixelated. Programs like Photoshop, Clip Studio Paint (Manga Studio), Adobe Illustrator Draw will allow you to create a ‘vector’ layer within the program, but you will not be able to EXPORT vectors from these pixel based programs – they will rasterise/flatten/pixelise your vectors when exported (meaning they are no longer vectors graphics and aren’t suitable for the laser software). Non-vector file formats include JPG, PNG, PDF (if saved from a drawing program like Adobe Illustrator Draw), PSD, BMP.Need Help?
Download File Template
Click here to download our Adobe Illustrator vector file template.
Ideal for use with Adobe Illustrator.
Click here to download our PDF vector file template.
PDF version for use with other design software.
This document is 600mm x 300mm (with a maximum usable area of 295mm x 595mm), and in RGB colour mode.

Preview of the file template opened with a vector graphics programs.
Need Help?
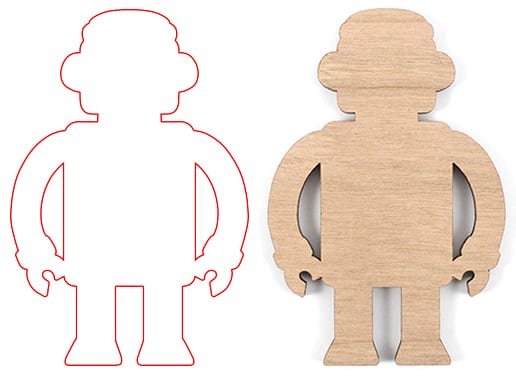
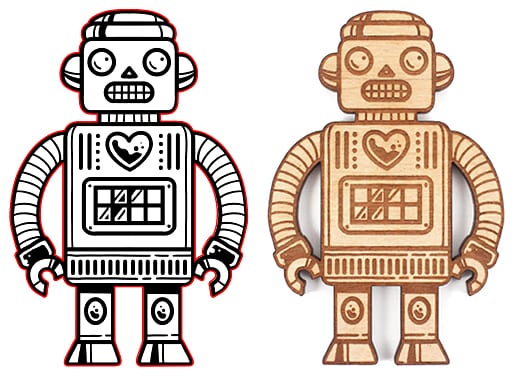
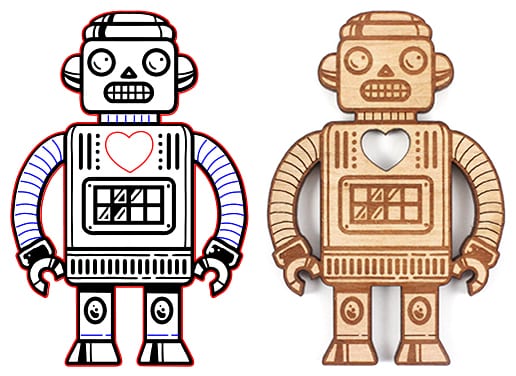
Cut Lines
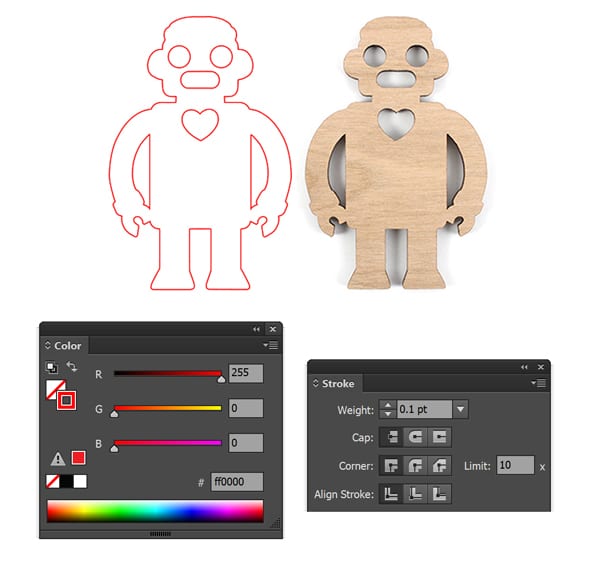
- For any lines that you want to be cut, give them a RED (255, 0, 0) 0.1pt stroke.
- Leave at least 1mm between each shape, and stay within 2-3mm from the edges.
- Completely remove any lines in your file that are not required, including any duplicate lines (the laser will cut every red line in your file, even if they are hidden by a shape or clipping mask). Duplicate cut lines may cause burning and scorching from excessive cutting.
- We recommend avoiding and/or cutting duplicates of small pieces (5mm or smaller). Pieces this small will fall literally through our laser machine base and we cannot guarantee that they will all be found.
- We recommend that your design doesn’t have parts that go thinner than 2mm. Pieces thinner than 2mm may be too fine and break when handled.
- Scroll down for more information.
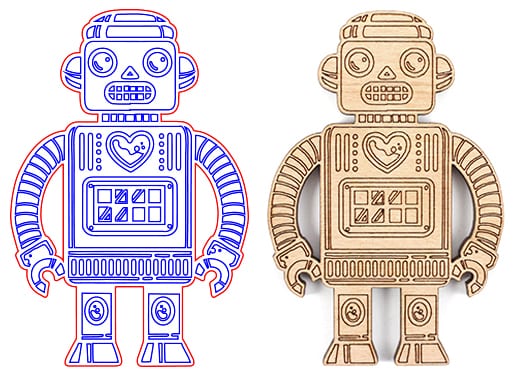
The robots below use red lines to demonstrate areas that have been cut. Scroll down for more information.
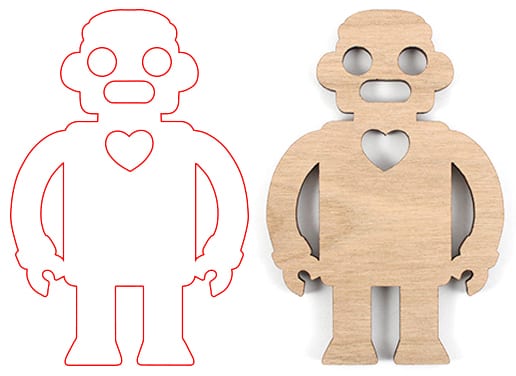
In order to cut, the laser head starts at a point on the image and traces freely along the line. The laser machine can only cut from a particular type of file known as a vector file; the laser head is guided by the vector points in the digital file.
When cutting, the laser head moves quickly along the line, leaving a smooth, un-burnt edge on most materials. The thickness of the cut line is very fine and precise and will cut exactly how your design appears on the computer. If you would like to design interlocking parts, you do not need to account for the thickness of the laser beam – just make the shapes the same size. The laser essentially vapourises the material where it cuts, and on some materials, like wood, can darken slightly.
For small pieces (around 5mm or less), these are very difficult on our end; they literally fall through the base of the laser machine and we cannot always find them all! We recommend avoiding pieces that are this small – certainly include duplicates so that you have a better change of receiving them all. You may find this a helpful tip for assembling your pieces also, so that you don’t have things that are too fiddly! Trust us on this one, we’ve been there!
While cutting very fine details are possible, it’s important to make sure that your design does not contain parts that are too thin, which might break when handled. To ensure that your design will be nice and strong, we recommend a minimum width of 2mm. This is best described on cutting designs like script style words; you would want to make sure that the details connecting the letters are at least 2mm so they are not too fragile.
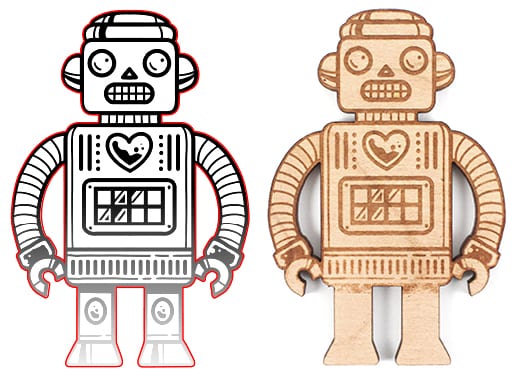
Raster Engraving
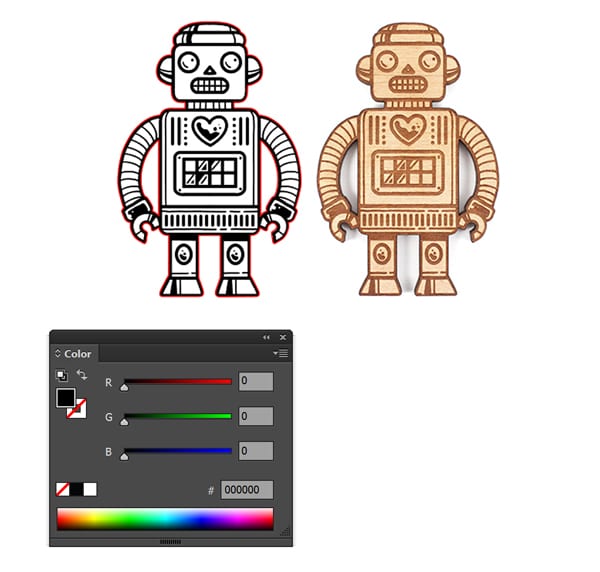
- For any areas that you want engraved, give them a BLACK (0, 0, 0) FILL.
- Engraving typically goes a frosted lighter shade on acrylic, and a slightly darker tone on wood.
- Engraved areas on acrylic can be paint filled, as acrylic paint will adhere to the engraved surface.
- Raster engraving does not need to be vector, you can place standard pixel images into your vector file.
- It’s OK if your areas to engrave (black lines) go outside of the shape that you are cutting (red lines).
- Scroll down for more information.
The robots below use black lines to demonstrate areas that have been engraved. Scroll down for more information.
Engraving with the laser is a method used to cut into a material surface to a specified depth. Engraving is most commonly used to add details or patterns to a design and can be done on any of our materials.
The way that the laser engraves is most similar to how a normal inkjet printer works – except instead of ink, it uses a laser beam with specified power and speed settings for the material being used. In order to engrave, the laser starts at the top of the piece, and proceeds left-to-right, top-to-bottom over the entire area. The laser turns on and off in rapid succession where areas of black and/or grey occur in the design. Any areas in white are left unmarked. The laser vaporises the material where it engraves, leaving an un-burnt indentation. On some materials, like wood, the engraved areas darken slightly. Because of the way that the laser head has to move over the entire surface being engraved, engraving is generally much slower than cutting.
Engraving can be done from any type of black and white image (created traditionally or digitally) and creates best results with solid black and solid white areas. The laser can etch at a very high resolution and works best with images at least 300dpi. While very fine details are possible, very thin lines don’t always show up well on different materials. To ensure that all of your details show up well, we recommend a minimum line width of around 0.3mm (ideally 0.5mm or wider if you intend to paint fill). If you’re going to add paint fill to the engraved areas, thicker lines will typically be easier as there is more surface area for the paint to adhere too.
Engraving grey-scale images such as a black and white photograph is possible, but is difficult to perfect because of the variation that happens between different images and materials. For most materials we use a protective tape on the surface of the material, so lighter greys may not etch through the tape at all. For engraving with grey and/or gradients, we recommend doing samples of the same image in varying levels of contrast, so that you may see is working best.
Fine Line (Vector) Engraving
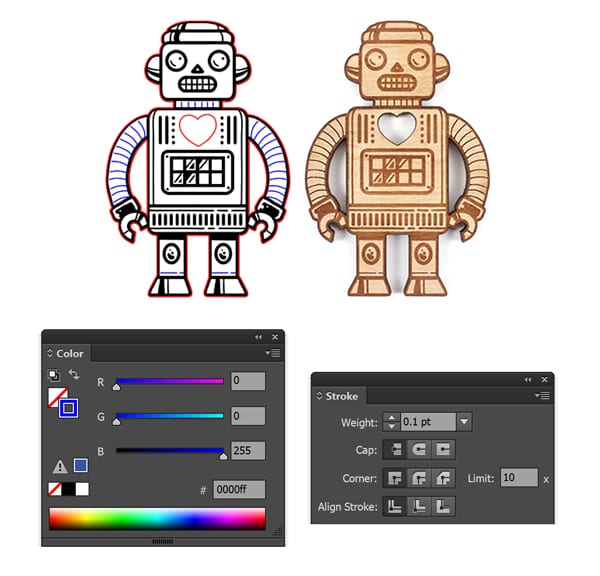
- For any thin lines that you want done with fine line (vector) engraving, give them a BLUE (0, 0, 255) 0.1pt stroke.
- Best suited for making simple, thin lines.
- When used suitably, can be much cheaper than raster engraving (as is much faster in the laser machine).
- Not an ideal engraving technique for paint fill (as the engraving is too fine to push paint into).
- Scroll down for more information.
The robots below use blue lines to demonstrate areas using line engraving. Scroll down for more information.
Line engraving is essentially the same method as cutting, but it uses a reduced power that lightly engraves the material (instead of cutting straight through it). With line engraving, the laser head starts at a point on the image and traces freely along the line – guided by the vector points in the digital file.
Because the thickness of the laser is so fine, line engraving works best for thin line-work. We recommend only using line engraving for making simple, thin lines. If you have many areas in your design that you would like line engraving (such as in the second robot example above), it can work out faster (cheaper) to use the raster engraving method.
Laying Out Your File
Start with the right file type
If you haven’t already, download our vector file template. It is suitable for use with vector programs, such as Adobe Illustrator (what we use and recommend) – which is what you’ll need to create a laser ready vector file. Make sure that you work in RGB colour mode.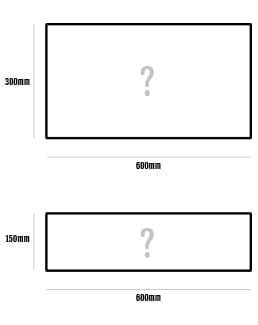
Check the material size
Check out our material range to double check the size of the material that you plan on working with. Make your file art board (the document size) the same size as the material that you plan on working with. Most of our materials are 600mm x 300mm, however size can vary. Solid wood sheets are typically only 600mm x 150mm (or 600mm x 100mm). Remember: your shapes have to fit WITHIN the material sheet, so the maximum usable area of a standard sheet is more like 295mm x 595mm.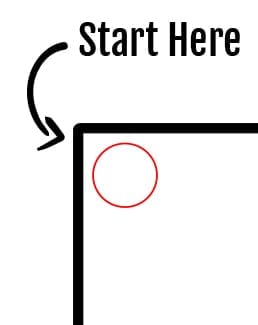
Start in the top left hand corner
Arrange your file in columns, starting in the top left hand corner. Tip: get familiar with the alignment tools in Illustrator, they can be very handy!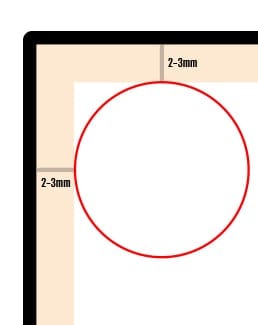
Leave 2-3mm from the material edge
Your shapes have to physically fit within the size of the material, so leave a 2-3mm margin around the edge of your artboard. In our file template, this is demonstrated by an orange rectangle (so fit your shapes within the orange rectangle).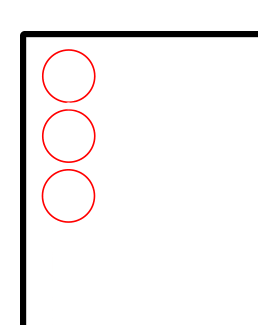
Arrange your shapes in columns
Working from the top left hand corner, arrange your shapes from top to bottom, left to right. Your material price will be based on the maximum width of material that you use.
Leave 1-2mm between shapes to cut
You can use the line tool to digitally measure distances. Too close may create too much heat, resulting in burn or scorch marks.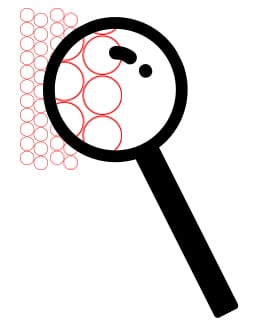
Avoid pieces <5mm
Or include duplicates. Pieces this small will literally fall through our laser machine base and we cannot guarantee that we can find them. You may find this a helpful tip for assembling your pieces also (so that you don’t have things that are too fiddly). Trust us on this one, we’ve been there!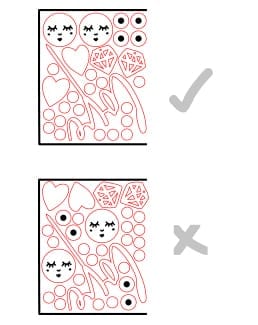
Group any raster engraving in a horizontal row
The laser will engrave from left-to-right, top-to-bottom (the same as how Westerners read) – so arranging any areas to engrave along a row at the top of your file is ideal. Engraving is priced by the total surface area that the laser head moves over. If your engraving isn’t laid out efficiently, it may add significant costs.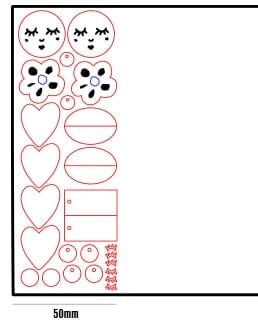
Use as little (or as much) of a material sheet as you would like
You do not need to order a whole material sheet, and will be charged only for the total width of material used (the height will always be set).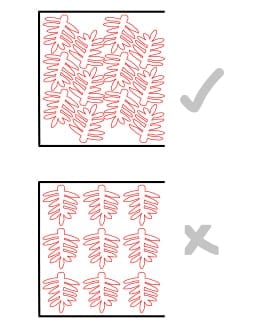
Tessellate shapes to fit closelyh4> Try rotating your shapes to tessellate them to fit closer together, which may save you money on material use.
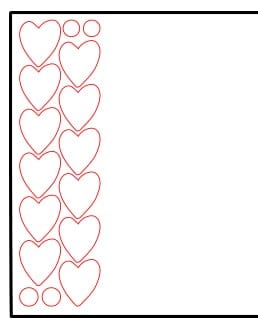
Add simple gap fillers
Fill in empty spaces of material with simple shapes you can make use of. Note: extra cut lines will add cost. Feel free to submit 2 versions of your file/s for a quote if you are unsure: one with gaps filler and one without.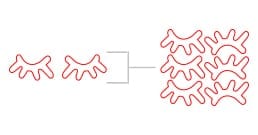
Add spares of small pieces
It’s a good idea to add duplicates of small pieces (around 5mm or less) so that you have a spare or two – just in case! You don’t want to be one small piece short of finishing an item if you accidentally lose a tiny piece…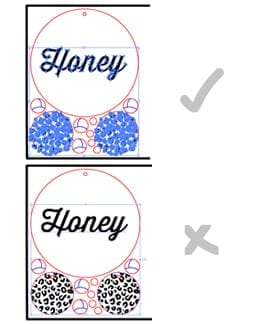
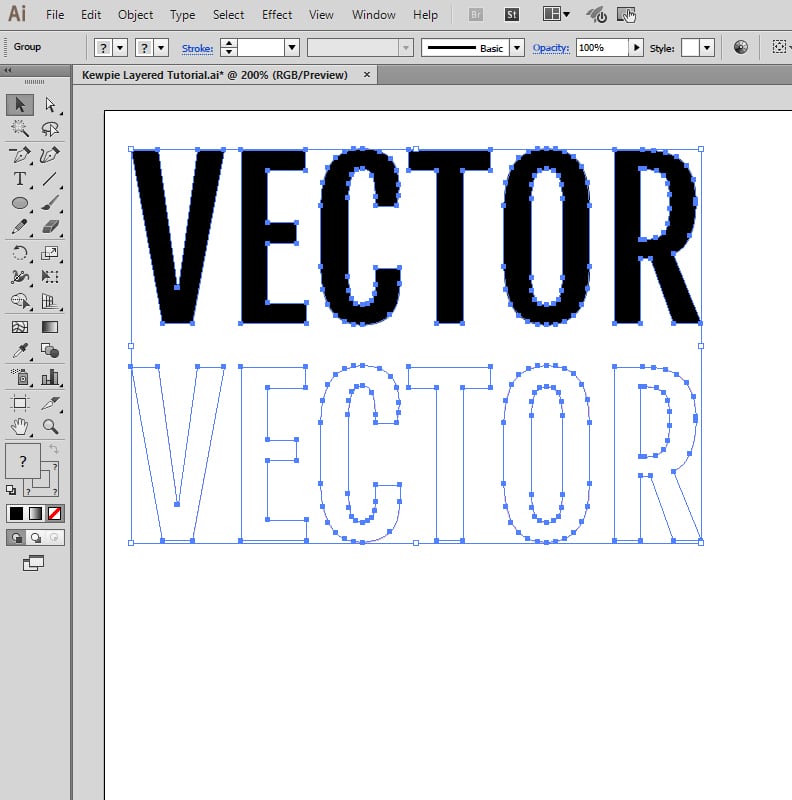
Expand type and patterns.
You must expand/outline fonts (such as you right click, and select ‘Create Outlines’), because we may not have access to the font that you have used. This is the same for pattern fills – they must be expanded.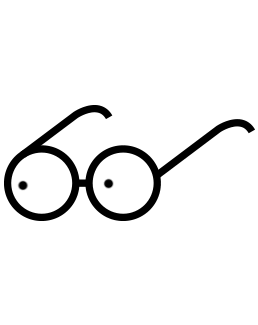
Look over your file
Remove anything in your file that doesn’t need to be there, including any illustrator visual effects e.g. like clipping masks, opacities or drop shadows. Tip: it can be helpful to print your file on a basic home printer to visually check for any errors. Errors we most commonly see are double cut lines, shapes that accidentally overlap, and pieces that are too small to realistically be laser cut.
Save Your File
Ensure that you preserve the illustrator editing capabilities and include any linked files. Vector file formats could include AI, EPS, SVG, DXF, DWG, and PDF (if the PDF was created in a vector program). Name your file with the colour and type of material you would like it laser cut from e.g. ‘December_Earrings_Silver_Chunky_Glitter_Acrylic.ai’.Need Help?
Inclusive File Proofing Service
As part of our quoting service, here’s what we guarantee we will look for (if applicable):
- Red cut lines are the correct colour and stroke width (anything other than what’s specified in our guides won’t be read by the laser and won’t cut).
- Blue engrave lines are the correct colour and stroke width (anything other than what’s specified in our guides won’t be read by the laser and won’t fine line engrave).
- Your file fits within the useable material area (files with a height over 295mm (or width over 595mm) simply won’t fit within the material sheet).
- Any text is outlined (any fonts in their native editable format may not appear ‘properly’).
- Shapes are well ‘nested’ (such as there is at least 1-2mm between objects)
- All ‘appearances’ are released (e.g. clipping masks, stroke effects, opacity is all at 100%, live paint groups, drop shadows, etc)
- Economic material usage
Here’s some other issues that we can’t guarantee we’ll find, but are common errors that we can usually notice while quoting. We will let you know about IF we notice:
- Overlapping shapes
- Sizing is to scale. We will check the artboard is the standard 600mm x 300mm size which suggests your pieces should be the size you made them on your end. Files from other software (CAD, Inkscape) commonly scales files up or down when we open in Illustrator. And the more info you give us the better, eg, ‘the circle in the top left corner is 30mm diameter’.
- Minimum cut widths
- Minimum engravings widths
- That there are no double cut lines (these are an easy mistake with a big impact; literally doubling your laser cut time charge AND scorching your pieces).
If we see an error, we will flick you back an email with what we’ve found so that you can modify your file/s and re-submit. Depending on our workload and how many errors we find, we may be able to change them for you, but will more commonly return your files for you to correct. Don’t worry, we’ll usually provide tips on how to correct the error/s.
Expert Design Tips
Design is a process
A good technique for designing is to draw the same thing 3 times with slight variations, then choose your favourite. Sometimes it takes a few attempts to get your brain to communicate to your hand! Have a design that’s almost ‘right’? Trace over your own design to make adjustments.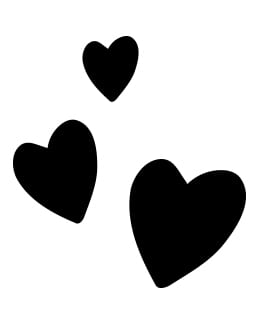
Work at actual size
Whether you’re drawing digitally or on a piece of paper, try to work at the size that you would like your actual laser cuts to be. One of the most common mistakes we see is when people have designed larger, then shrunk their design down – resulting in pieces that are too detailed or too fine to realistically be laser cut.
Think about where a hole will fit
If your designs will need to hang (such as they will become earrings), make sure there is space for a hanging hole – plus some space around the hole so that it fits. We recommend 2mm holes, with 2mm of material around the hole.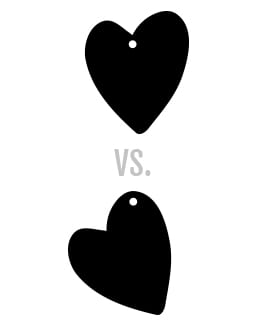
How will it hang?
For hanging designs, consider the balance of your design. Will it hang how you envision? Do you need to modify the hole placement to have it hang differently?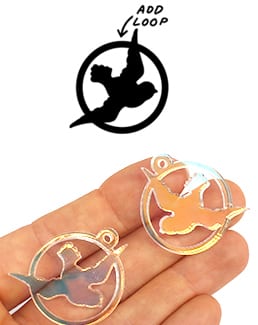
No Room For a Hanging Hole?
If you can’t fit a hanging hole, try opting for a ‘loop’ instead. ‘Loops’ are added 6mm circles with a 2mm hole. They’re are a great option for creating hanging designs from thin shapes.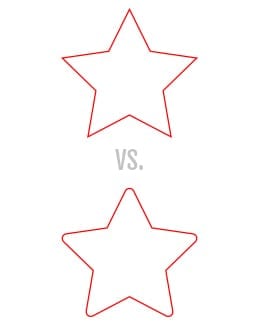
Avoid sharp points (for wearable pieces)
If you’re designing pieces that people will wear (such as earrings or brooches), consider rounding the edges of your designs to soften the laser cut edges. Acrylic cut to a point can be quite sharp! You could also experiment with sanding pieces after they are cut, but rounding the digital file before it is laser cut may save time to achieve a similar result.
Avoid and/or include duplicates of pieces <5mm
Or avoid pieces this small all together; they will literally through our laser machine base and we cannot guarantee that we can find them. You may find this a helpful tip for assembling your pieces also (so that you don’t have things that are too fiddly). Trust us on this one, we’ve been there!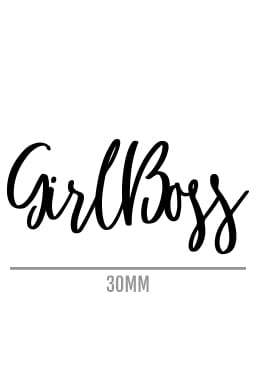
Make sure details aren’t too thin
If your shapes are too thin, they may break when handled – or physically fall apart when we take them out of the laser machine. We recommend a minimum width of 2mm. We aren’t able to proof your designs to make sure that they don’t contain parts that are too thin, so make sure to double check your design details before ordering.
Print your design at home
The BEST way to get an idea for sizing is to print out what you want so that you can view the actual size in real life. It can be a low quality print on a basic printer – just print it out, roughly cut it out, and have a look. Seeing things in real life at actual size is super helpful. When you print it out, you might find that your design is too detailed and needs to be larger, or that some parts are too fine and need to be thicker, or it might be just perfect! Either way, if you can be pleased with how your design is looking at this stage, you’re going to love how they are laser cut!
Make sure engraving isn’t too fine
The laser cutter is able to engrave really very fine details, but if your engraving is too fine it may not even show up on the material. As a general rule of thumb, we recommend a minimum line width of around 0.2mm (ideally 0.5mm or wider if you intend to paint fill). We aren’t able to proof your designs to make sure that any engraving isn’t too fine, so make sure to double check your design details before ordering.
Thicker engraved lines can be easier for paint fill
If you plan to paint fill your engraving (such as with an acrylic paint pen and colour in the engraving), a thicker engraving line is typically easier (when compared to thin engraving or fine line/vector engraving). This is because there is more surface area to ‘push’ the paint into. The acrylic paint will only adhere to the textured surface of the engraved areas.
Digitally measure widths
Use the line tool on the computer as a digital ruler. You can measure the widths of your raster engraving to make sure that it’s at least 0.3mm wide (ideally 0.5mm wide if you intend to paint fill). You can also measure the material width to make sure that your pieces aren’t too fine, for example, at least 2mm wide.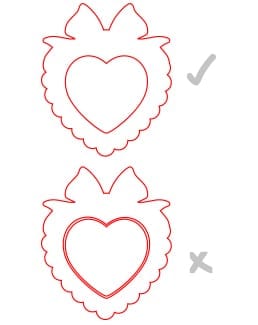
Digitally test fit
Pieces will fit together in real life as they do on screen. The thickness of the laser cut line is very fine and precise, and will cut exactly how your design appears on the computer (so your shapes should fit together as perfectly as possible).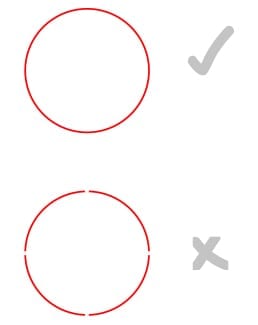
Ensure all cut lines are joined
The laser follows the line you create; if there are any gaps, the laser will not cut that section. For example, a circle is best when created digitally as one continuous cut line. If the circle is digitally created by a sequence of lines, it may have a noticeable effect. We have seen files where there are tiny gaps in between lines, leaving designs with uncut gaps.
Be cautious of intricate shapes
Little cut outs in shapes will often need to be pushed out (such as you need to use a skewer or pin to push the off-cuts out). If the pieces to push out are small (less than 2mm) this can end up becoming quite the task! Tip: Mirror acrylic is the most difficult to push small pieces out from – don’t opt for mirror if your design has lots of internal cut out details.
Share cut lines to save cutting time
If you can combine shapes to ‘share’ a cut line, there will be less cutting for the laser to do, and your file can cut faster (= cheaper). Just make sure that there are no overlapping lines (such as you accidentally create two cut lines on top of one-another).
Delete duplicate cut lines
The laser software will find and cut any red line in your file. This includes any duplicate cut lines, and any lines hidden by a clipping mask. Duplicate cut lines will cost more (as you’re paying to cut the same shape/s twice), and it will typically burn and scorch pieces from excess heat. Tip: double cut lines usually appear as slightly thicker or bolder shapes in your file.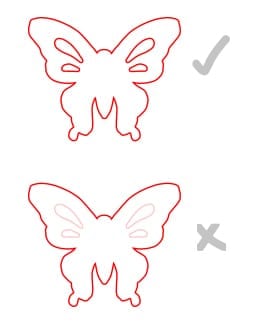
Make sure everything in your file is 100% opacity
We commonly see the laser software unable to recognise cut lines if the digital file has anything that is other than 100% opacity. Selecting all of your shapes and making the opacity 100% doesn’t necessarily resolve this, as opacity settings can be modified further within groups and layers. Our best tip is keep your file for lasering simple and always work at 100% opacity.
Swap ins-and-outs in another colour
You can ‘swap’ ins and outs of the same pieces cut in different materials. This will add variety, and also minimise waste. For example, cut a flower shape in two different colours and then ‘swap’ the centres.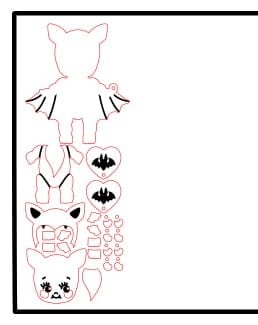
Print your laser file to proof it
Sometimes things don’t show up as clearly on screen as they might in real life, such as any sizing issues, or accidental overlapping cut lines. It doesn’t sound very fancy or fool proof, but if you can be happy with your designs in your hands at actual size in paper before investing in getting them laser cut, you’re likely going to love how they are laser cut!
Order material samples
Not sure what material to use? Order some Sample Swatches. They can be purchased individually, or you can purchase a complete set of a range. Typically, plainer materials (like solid acrylic) look best for more complex shapes (e.g. snowflakes); fancier materials (like chunky glitter) look best for simpler shapes (e.g. circles).
Do a sample cut in black, white or clear acrylic
Not 100% sure on your design, or just want to see a sample first? Arrange a variety of shapes to test on a cheaper material (such as white acrylic) to sample them before ordering in fancier materials, like glitter.Helpful Pre-Quote Checklist
Before submitting your file for quote, check:
- Your file is an editable vector file (such as it was created with a vector program like Adobe Illustrator, Gravit, etc).
- Your document colour mode is RGB (File > Document Color Mode > RGB Color).
- Cut lines are RGB red (255, 0, 0) with a 0.1pt stroke.
- Any areas to raster engrave are RGB Black (0,0,0).
- Any fine line engraving lines are RGB Blue (0, 0, 255) with a 0.1pt stroke.
- Designs fit within material sheet size (i.e. you’ve used left 2-3mm in from each edge of the material).
- You’ve laid out the quantities of shapes that you would like such as 20 x circles, 10 x triangles, etc in your file.
- Any text is converted to outlines (Type > Create Outlines).
- All objects are at 100% opacity (including shapes in groups).
- There is at least 1-2mm between shapes.
- Remove all clipping masks.
- You’ve included duplicates of fine pieces (e.g. <5mm).
- You’ve made sure there are no accidental overlapping pieces.
- You’ve made sure there isn’t cut lines around your engraving areas
- You’ve removed anything in your file that does not need to be there (including double cut lines).
- Your file is named with the colour and type of material you would like it laser cut from e.g. ‘December_Earrings_Silver_Chunky_Glitter_Acrylic.ai’.